
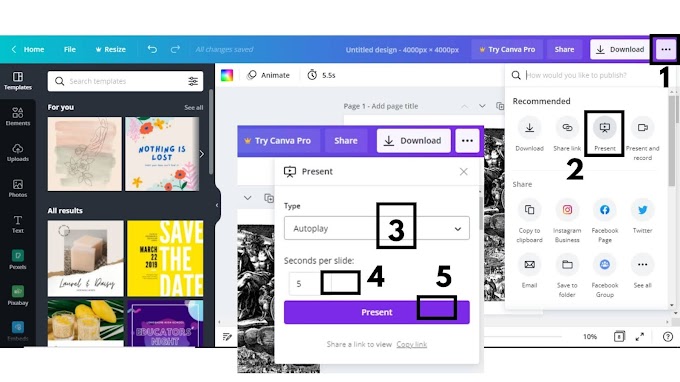
Various features offered by CANVA provide users to show different effects the one including binocular effect. These features are free to use from CANVA and are from "frames" of the elements section present on the left-hand side navigation.
In this tutorial, we are going to learn how to make a Binocular effect in 8 simple and easy to do steps. All we need is to open CANVA1, sign up, and select the "long-distance object" photo from the photos section.
In this tutorial, it is important to have a long-distance photo of an object so
the binocular effect is best seen.
The image should be such that an object is present at a long distance which a be a
man, house, car, etc.
In this case, we have used car traveling at a longer distance from where we try to capture it from our binocular frame offered by CANVA for free.
Without
wasting any time let's deep dive into these easy 8 steps to complete this work.
STEP NO - 1

- Head on to "photos" section on the left-hand side navigation tool and Search for objects like "road", "highway", "path", "mountains" and select the one having an object at the longer distance.
- In this example, we have used a car traveling in the front at a longer distance so we see it from a binocular.
- This is an example and referring to this one can get an idea to design their point of view as an artist has his own idea and knowledge.
- If one is not satisfied with a photo from the CANVA library then they can use their own taken photo and start designing on it.
STEP NO - 2

- Now in this case, the selected image is a little black and white format so it can be filtered and changed to a different color or shade.
- Select the background image and select "filter" to change its shade.
- Here in this case, I have selected filter "Retro" and adjusted its intensity to 80 for making it more colorful.
- More the intensity darker becomes the shade of the filtered photo and this you can take as per your design and imagination.
STEP NO - 3

- Take the same image on a different interface or design.
- In this step, you have to cover and capture the photo of the object from a small distance.
- To do this take the same image on a different interface or design and zoom it till a small part like a camera covers it.
- At the end of the episode, it should look like it is been seen through binocular so try to cover only the short area near the object and forget about the extra background.
- Download this photo and again upload it to CANVA by simple drag and drop to the interface as it will need in step no 6.
STEP NO - 4

- Head on to the "elements" section again and "frames" and scroll down and search for objects that appear like binocular.
- There are two objects that form a binocular shape left faced and right faced so select them both.
- Place and align them at the center & below the object on the main screen background to make an observation scene.
STEP NO - 5

- Change the color of the binocular frame as per the design and need.
- In this case, I have changed the color from black to dark blue that matches the color of the filter on the image.
- Decide the color of the binocular as per the type of image and its colored chooses by you.
STEP NO - 6

- Insert the image prepared and uploaded from step number 3 to put them in the frames of binoculars to make the effect.
- Make It's a duplicate copy as we need 2 images to put in both the frames.
STEP NO - 7

- Drag and drop the images in two different frames and see the effect of how it looks after looking through a binocular.
- When I dropped them into the frames I had to again delete them and realign as per the 90-degree angle of the road to adjust it I switched the angle of the image to put in the frame to about 4 degrees from both sides.
- This made both the images from the binocular to look like they make a perfect match with each other.
STEP NO - 8

- Check the result and make changes in the orientation of the images to put in the frames of binocular.
- Add other elements that you would like to see them in your design as per your imagination.
- Here in this case, I have added extra sun in clouds and birds flying in the sky.
So the Conclusion of the article is:
1. The image that includes an object at a long-distance and a photo with high HD is required to catch the zoom.
2.
Alignment
of photos' main zoomed part and the one seen through binocular is very
important to check.
3.
Binocular provided in CANVA comes in two different parts so match it in the
center and give it the best color.
4.
Preparation
of the zoomed object image plays an important part as it should be visible in
binocular.
If
you have some different ideas then do not hesitate to share with us.
Thanks
for having your precious time.
With
Best Regards


0 Comments
Please do not enter any spam link in here