CANVA - Thumbnail maker for YouTube

CANVA1is the tool growing on social media that allows content creators to make a thumbnail for youtube videos.
In this article learn to make thumbnails for your videos that will catch the
user's attention.
Thumbnail
is the viewer's choice to make the decision to watch the video or not.
If the thumbnail is not appropriate then
viewers might not be interested in watching the video even when the video
content is rich.
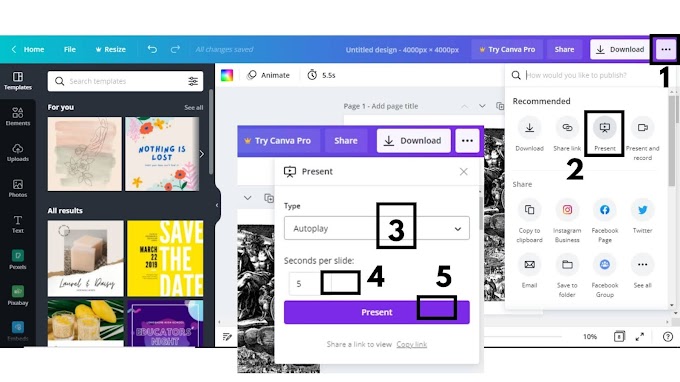
If you have not yet signed up with CANVA2 then signup and open the interface and select "create a design".
Here
one needs to search for "YouTube" and select the fourth option "YouTube
thumbnail".

On
this new design interface, one is able to select many free templates offered
from CANVA and is able to edit it.
In this case, I am going to select a "background" color first and then
download the background image.
This is because I have to give an effect to
the background image if didn't want to give the effect then I would not have
done this procedure.
Upload the downloaded image again to the CANVA design interface by dragging it to the design interface or one can upload through "uploads".
Select the uploaded image on the design
surface and from the top navigation menu select "filter" -
"Peony" and intensity "100".

One
can select the background color and filter as per their need for the design
idea.
Add a new page and select here photo that
represents your content idea as in this case I am selecting a photo of a
traveling lady.
I will select the photo, download it to my device, and remove the background of the photo using remove.bg3if you are a premium member of CANVA it offers one click to remove any image background.

Remove.bg removes the background of any
website in just seconds and also allows user to erase or recover the required
part by an easy to use interface with zoom in & out options.
Upload the background removed image to the
canvas design interface and select it on the left side of the interface.
Here
users can select their own photos and remove their background and use for their
design.
Select the image and under the "adjust"
section increase the brightness and contrast to "100"
to make this image white & blur around "30".

Again select the same image from the uploads section to make it fit on this white image.
One
is now able to see the brightness effect at the background of the image.
Now select the image and under "filter"
select "summer" with an intensity of "80"
and you can also select as per your desire.

Now under the "elements" section Search for a few free travel elements to place them all on the design interface.
Here
in this case, I will place earth with clouds and airplane the women traveling
around the globe.
But
before proceeding with the free earth element I would like to give it a shadow the effect through an image.
If
I try to give a shadow effect directly on the element it does not give any option to
provide any effect.
On
the new design, interface select a "circle" form "shapes"
in the "elements" section and make it black.
Download
this image and remove its background and upload it back to the canvas
interface.

Now
upload this image first and make it blur under "adjust" so
that now we can add the earth element on it.


Under the elements section search for
"earth" and select a free element and adjust it on the shadow
and change the color as per need.
You
are also able to adjust the shadow and then adjust the element as per the
design space.

Again
Search for "travel" in the elements section and try to pick up
some free elements like the airplane, etc.
You
can select free elements as per your topic of the video you are preparing the
thumbnail for.
Place
the element behind an existing image by "position" on the top of the right corner of the interface.
For example, in this case, I have selected a world map and I want to place it behind
the traveler girl.
Select
the world map element select "position" and select
"backward".

Now
only the element is appearing at the backside of the girl but in the bright light, the effect is disappeared.
So here one has to select the "backward"
option 2 times as we had placed two images of traveler girl one for
brightness and one overlap over it.
Change the color of the element as few of the free elements offer to change the color and few elements do not offer to change it.
You are able to tilt any object in any direction you want with the rotating symbol available at the bottom of an element that comes after selecting it.
Add some text that describes your topic
well title - subtitle and also provide website details at any corner of the
page.
After
selecting the text provide "shadow" under the effects where one is
able to make their text fancy.

Change
the font and size as per the design interface as here I am choosing font "Aprilia
Bold" for the title.
Select
the size of the text from the upper tools or one is also able to change it by
drag and make the size less or more.
Change
the text color and under effects select the best suitable shadow for it.
Now
select the zoom option and make it to 10 % so that we can add a transparent
"gradient" effect on the entire design.

Under the "elements"
section search for the "gradient" and select the transparent blue gradient of which the color can be given as per our design.
Select and spread the gradient over
the entire design by extending it to full and now make the zoom size to "fit"
the design.

Keep a very light shade of gradient if
required otherwise one can also decide which look is better with or without
gradient.
Now I will place another gradient at the
bottom of the girl where the design screen ends and change its color to the
background-color to make the perfect look at the design.
Provide
your website name at the bottom right corner and logo at the top right corner
and the design is final.

If
anyone of you has different ideas please let us all know about them.
Thanks
and best luck with your design.


0 Comments
Please do not enter any spam link in here